Feeling a little cooped up? Need some ideas for fun things to make, bake and do? I’ve rounded up a list of my 25 favorites.


1. A winter village like this one by Mer Mag
2. Snow globes by Martha
3. This fun mini viewer (would make a sweet Valentine’s Day gift!)
4. Photos of special people, favorite toys, pets, friends and make a tiny book (by Printstagram):

5. A terrarium (find a tutorial here or buy one of these which repurposes wine bottles)
6. Gold leaf papier mache bowls by Kelli Murray:

7. Cupcake liner ribbons (good for Valentine’s Day or birthdays)
8. Dozens of printable activities at Mr. Printables, including this sweet “My Paper World”
9. Washi tape crafts: decorate notebooks, make a washi tape town (and use this washi tape), or even frame some prints on your wall with washi tape.
10. Don’t have a lot of space? Here’s a collapsible cardboard house for your little ones.
11. Sweet little calendar by Eat Drink Chic to give as gifts to your friends:


12. Salted caramal apple pocket pies! Get the recipe from Just a Taste here.

13. Hot chocolate + marshmallows (ever made your own hot chocolate and marshmallows?)
14. Homemade pretzels (I usually double this recipe by Elephantine)
15. Afternoon tea + sandwiches (get lots of traditional afternoon tea recipes here)
16. Heart shaped doughnuts by Sugar & Cloth

17. 5 favorite cinnamon roll recipes from the Kitchn
18. Popovers with strawberry butter by Sweet Paul

19. Listen to episodes of RadioLab and learn fascinating stuff
20. Learn how to grow a pineapple from Instructables
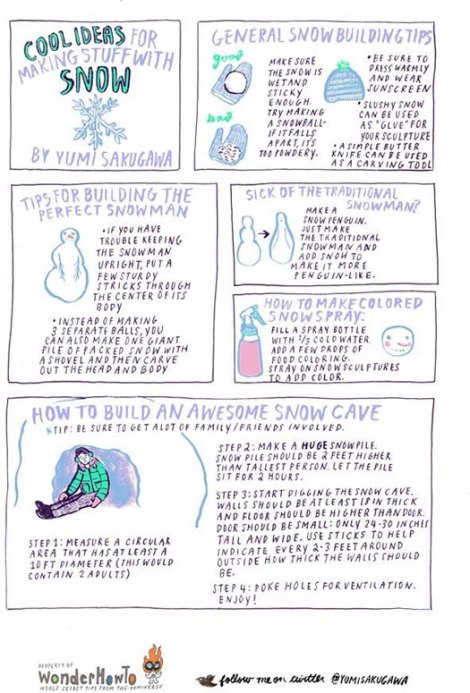
21. Play outside in the snow. Make colored spray and build the perfect snowman:
22. Cool and inexpensive home science projects to blow your mind, like making a pickle glow!
23. Attend art school with Classic Play
24. Draw mustaches and funny hats with a sharpie on models in your old catalogs and magazines
25. Have an outdoor winter treasure hunt! (And 22 other great winter activities).

What if you live where it’s warm and there’s no snow, you ask? Check out my 25 Ideas for Summer Family Fun and 25 More Ideas for Summer Fun.
That’s 75 ideas – now go do something!
Images from top to bottom (see links above): Mer Mag, Printstagram, Kelli Murray, Eat Drink Chic, Just a Taste, Sugar and Cloth, Yuki Sakugawa (Secret tips from the Yumiverse), and iVillage


